摘要
- Machine Learning Workflow
- Problem: 宠物分类、勋章识别、美女打分
- Demo: Hello TensorFlow !
- TensorFlow C library / Go binding
Machine Learning Workflow
- Define the problem. What problems do you want to solve?
- Start simple. Be familiar with the data and the baseline results.
- Then try something more complicated.
Problem
人类喜欢将所有事物都纳入鄙视链的范畴,宠物当然也不例外。一般来说,拥有一只纯种宠物可以让主人占据鄙视链的云端,进而鄙视那些混血或者流浪宠物。甚至还发展出了专业的鉴定机构,可以颁发《血统证明书》。但是考究各类纯种鉴定的常规方法,主要标准是眼睛的大小、颜色、鼻子的特点、身躯长度、尾巴特征、毛发等特征,当然也包括一些比较玄幻的属性,例如宠物家族的个性、气质等等。
外军研究:美军授勋及嘉奖制度观察一文中提到,世界各国军队都有自己的制服、军衔、勋章体系,它们既是军人荣誉的体现,也包含了丰富的职业信息。但是体系过于庞大也会带来识别困难,例如下图中的两位美军士兵,是否可以有一种方案可以自动、准确地识别各类徽章的意义呢?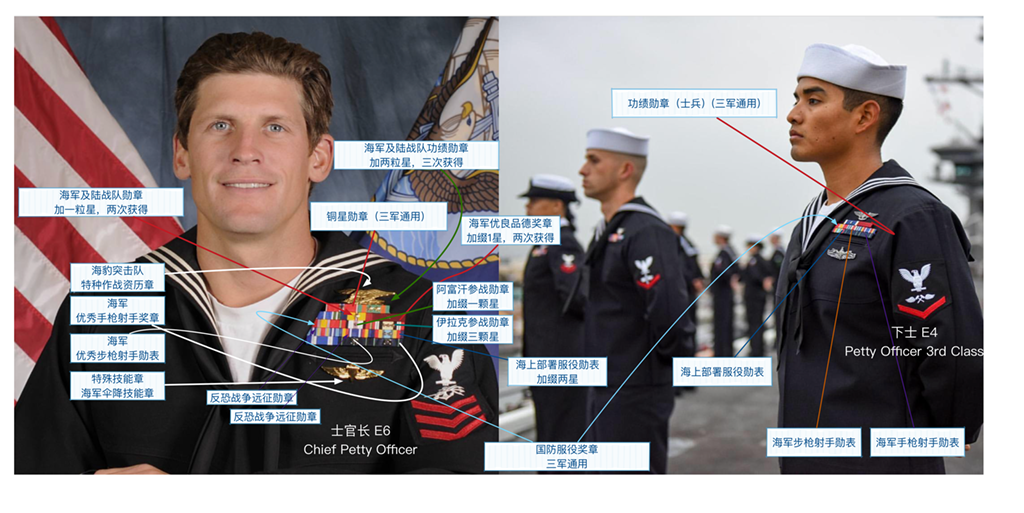
中文网络上有一个特殊名词:颜值。通常用来表示人物颜容英俊或靓丽的数值。人们希望有一个衡量标准可以用来评价、测量和比较人物容貌,许多社交软件甚至可以利用计算机视觉识别技术分析颜值、年龄、性别,甚至与好友一起进行颜值 PK ,当然这些软件的 “颜值” 算法总是备受争议。
其实以上三种场景本质上都是图像识别,可以概括为一种基于外观的分类(或者说“打分”)需求,接下来我试图基于机器学习的方法来解决这些问题。
Demo: Hello TensorFlow !
Tensorflow is not a Machine Learning specific library, instead, is a general purpose computation library that represents computations with graphs.
TensorFlow 开源软件库(Apache 2.0 许可证),最初由 Google Brain 团队开发。TensorFlow 提供了一系列算法模型和编程接口,让我们可以快速构建一个基于机器学习的智能服务。对于开发者来说,目前有四种编程接口可供选择:
- C++ source code: Tensorflow 核心基于 C++ 编写,支持从高到低各个层级的操作;
- Python bindings & Python library: 对标 C++ 实现,支持 Python 调用 C++ 函数;
- Java bindings;
- Go binding;
下面是一个简单的实例:
环境准备
安装 TensorFlow C library,包含一个头文件 c_api.h 和 libtensorflow.so
1
2
3
4
5
6
7
8
9
10
11
12
wget https://storage.googleapis.com/tensorflow/libtensorflow/libtensorflow-cpu-linux-x86_64-1.5.0.tar.gz
## options
# Change to "gpu" for GPU support
TF_TYPE="cpu"
TF_VERSION='1.5.0'
curl -L \
"https://storage.googleapis.com/tensorflow/libtensorflow/libtensorflow-${TF_TYPE}-$(go env GOOS)-x86_64-${TF_VERSION}.tar.gz" |
## 查看 tensorflow 版本
$ python -c 'import tensorflow as tf; print(tf.__version__)' # for Python 2
$ python3 -c 'import tensorflow as tf; print(tf.__version__)' # for Python 3安装 Go 语言环境,参考:玩转编程语言:Golang
安装 Tensorflow Go binding library
1
2
go get github.com/tensorflow/tensorflow/tensorflow/go
go get github.com/tensorflow/tensorflow/tensorflow/go/op下载模型(demo model),包含一个标签文件 label_strings.txt 和 graph.pb
1
2
3
4
mkdir model
wget https://storage.googleapis.com/download.tensorflow.org/models/inception5h.zip -O model/inception.zip
unzip model/inception.zip -d model
chmod -R 777 model
Tensorflow Model Function
1 | //Loading TensorFlow model |
Classifying Workflow
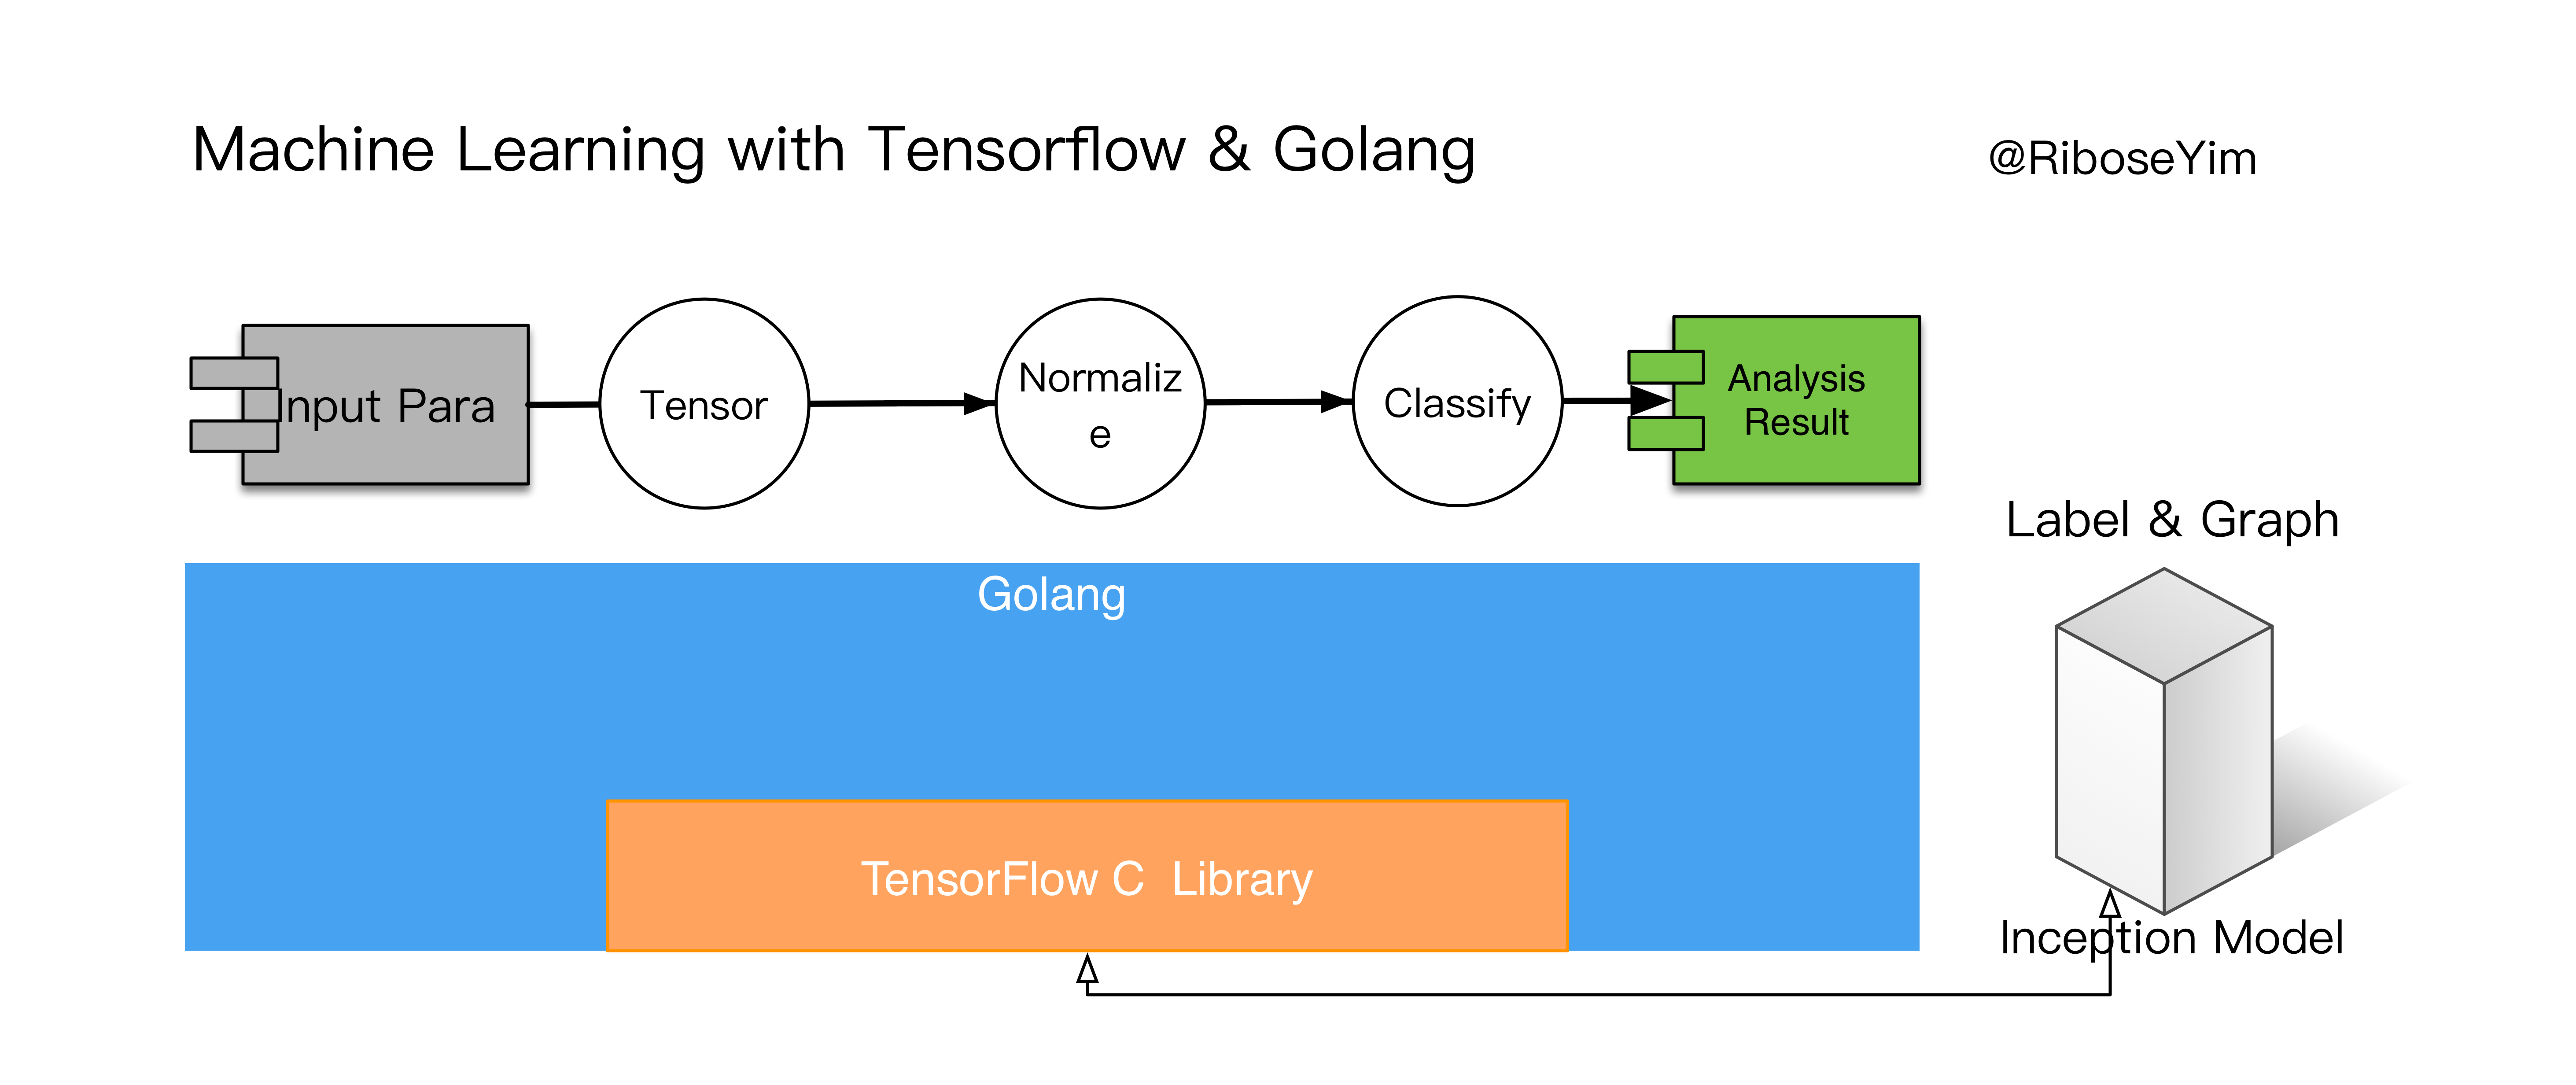
基于 Tensorflow 模型实现图像识别的主要流程如下:
- 图像转换 (Convert to tensor )
- 图像标准化( Normalize )
- 图像分类 ( Classifying )
1 | func recognizeHandler(w http.ResponseWriter, r *http.Request, _ httprouter.Params) { |
函数 makeTensorFromImage() which runs an image tensor through the normalization graph.1
2
3
4
5
6
7
8
9
10
11
12
13
14
15
16
17
18
19
20
21
22
23func makeTensorFromImage(imageBuffer *bytes.Buffer, imageFormat string) (*tf.Tensor, error) {
tensor, err := tf.NewTensor(imageBuffer.String())
if err != nil {
return nil, err
}
graph, input, output, err := makeTransformImageGraph(imageFormat)
if err != nil {
return nil, err
}
session, err := tf.NewSession(graph, nil)
if err != nil {
return nil, err
}
defer session.Close()
normalized, err := session.Run(
map[tf.Output]*tf.Tensor{input: tensor},
[]tf.Output{output},
nil)
if err != nil {
return nil, err
}
return normalized[0], nil
}
函数 maketransformimagegraph() 将图形的像素值调整到 224x224,以符合模型输入参数要求。
1 | func makeTransformImageGraph(imageFormat string) (graph *tf.Graph, input, output tf.Output, err error) { |
最后,将格式化的 image tensor 输入到 Inception model graph 中运算。
1 | session, err := tf.NewSession(graph, nil) |
Testing
1 | func main() { |
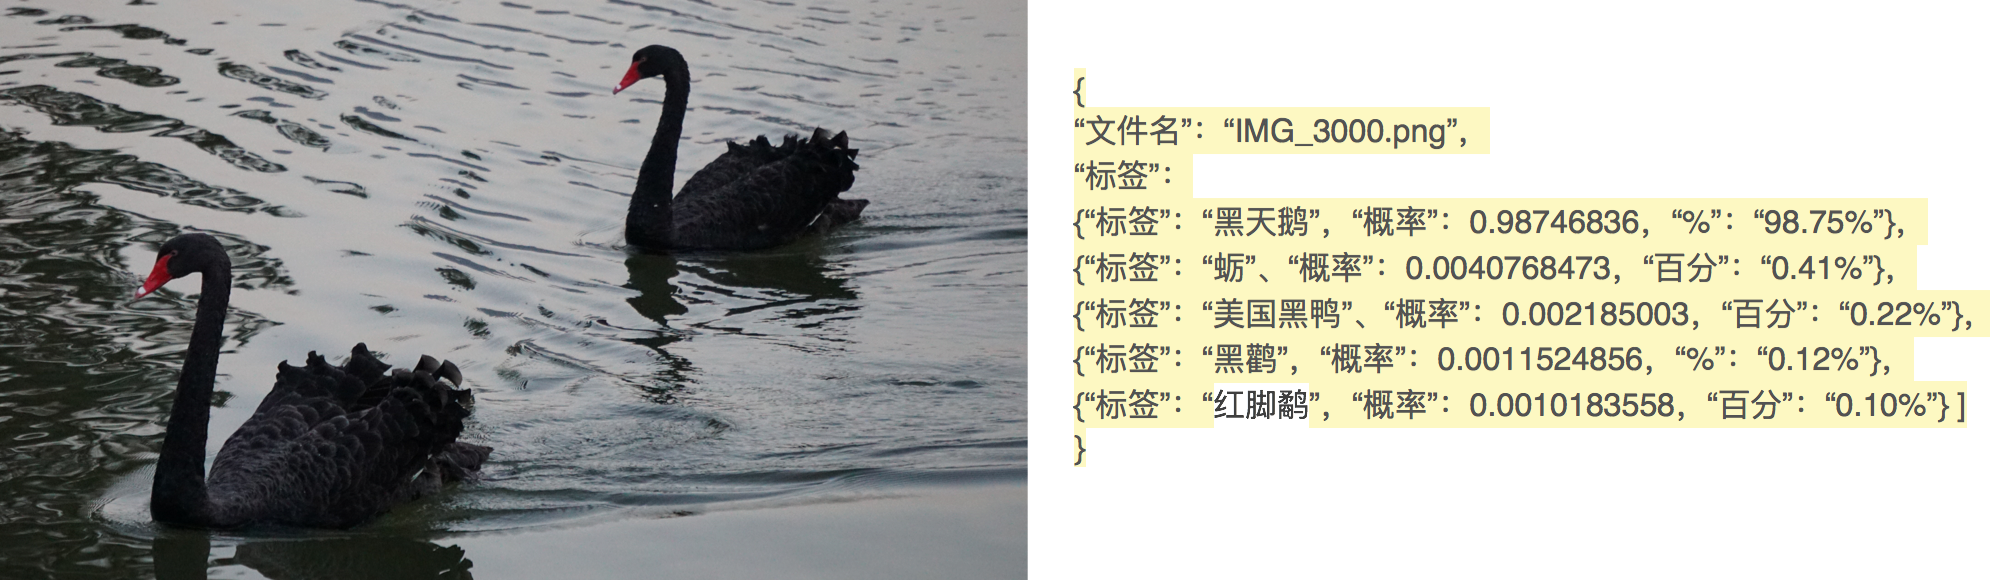
1 | $ curl localhost:8080/recognize -F 'image=@../data/IMG_3560.png' |
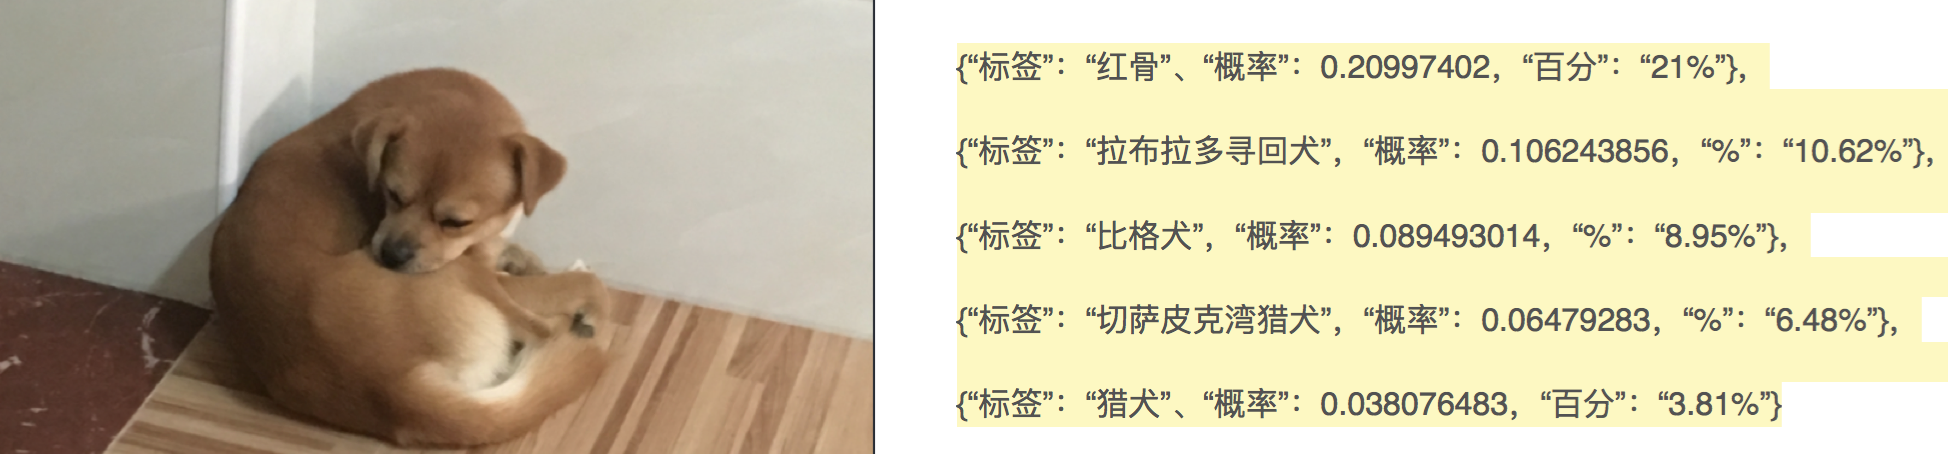
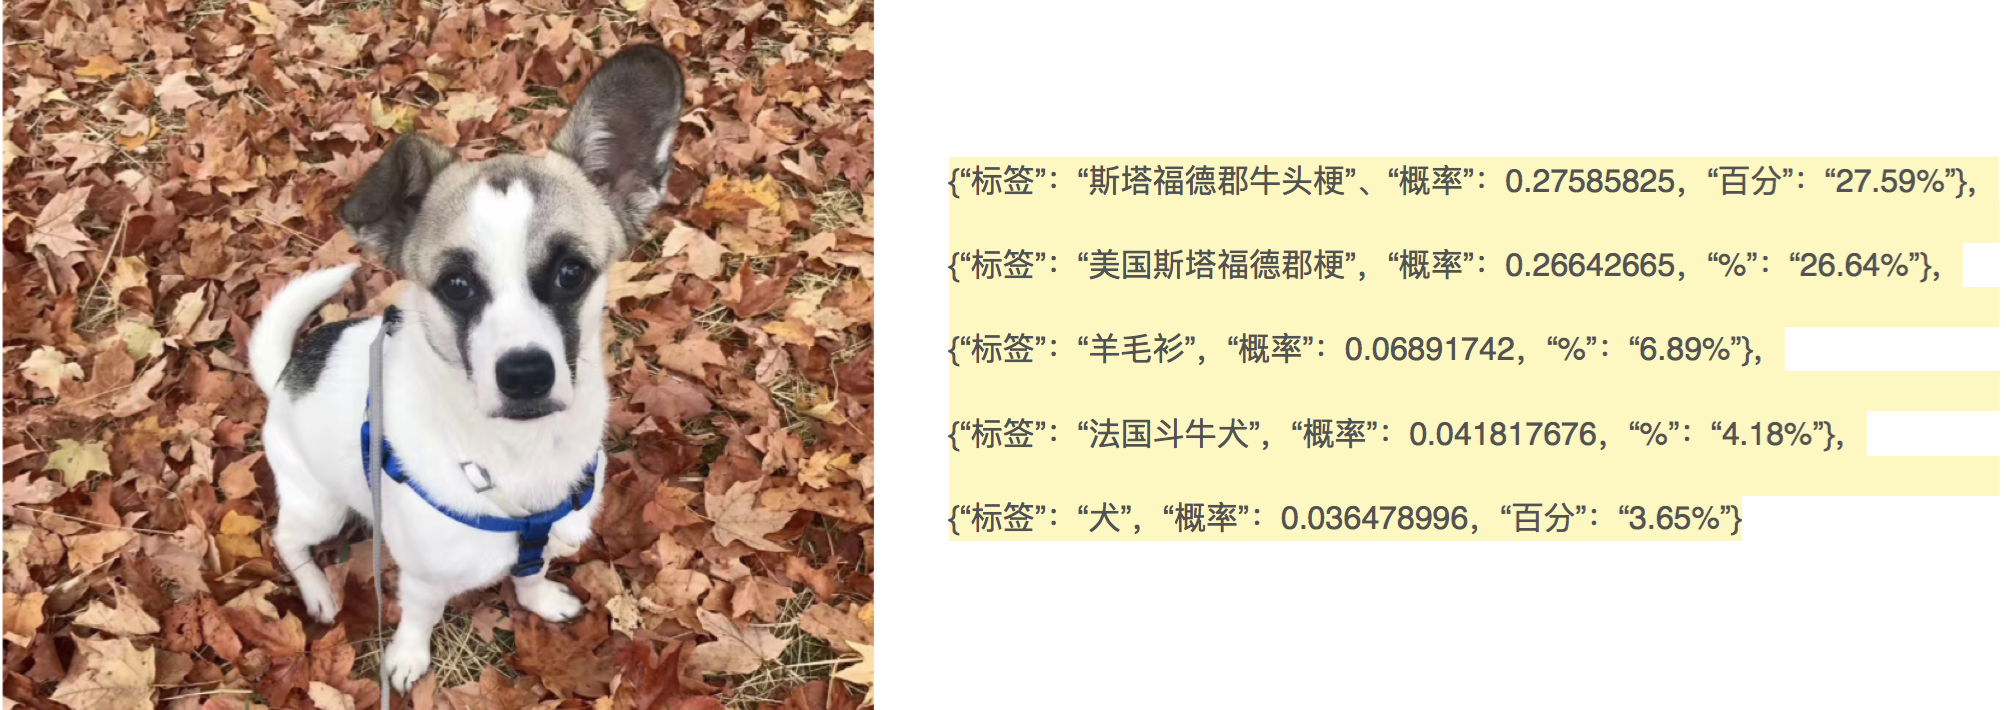
通过上面的案例我们可以发现,这个服务目前可以对于黑天鹅图像的推算概率值为 98.75%,非常准确;但是对于另外两张宠物狗的图像,最高的推算概率值也仅有 30% 左右,虽然也没有被识别成猫咪或者狼,但是和理想效果要求可用性还有一段距离(此处暂时忽略物种本身的复杂性)。主要是因为现在我们使用的还只是一个非常“原始”的模型,如果需要为小众领域服务(宠物,也可以是其它事物),需要通过训练(Training Models)增强优化,或者引入更丰富的标签,更合适的模型。当然,训练过程中也会存在样本质量不佳的情况,错误样本和各种噪音也会影响准确度。
Tips
How to Install TensorFlow on CentOS 7
1 | # 1. To enable the repository, install the SCL release file: |
Lessons
扩展阅读
Getting Started with TensorFlow: A Machine Learning Tutorial
YoutubeIntroduction To TensorFlow
We Need to Go Deeper: A Practical Guide to Tensorflow and Inception
Tensorflow.org: Image Recognition
We know that label 866 (military uniform) should be the top label for the Admiral Hopper image.
扩展阅读
《The Machine Learning Master》

- Machine Learning(一):基于 TensorFlow 实现宠物血统智能识别
- Machine Learning(二):宠物智能识别之 Using OpenCV with Node.js
- Machine Learning:机器学习项目
- Machine Learning:机器学习算法
- Machine Learning:如何选择机器学习算法
- Machine Learning:神经网络基础
- Machine Learning:机器学习书单
- Machine Learning:人工智能媒体报道集
- Machine Learning:机器学习技术与知识产权法
- Machine Learning:经济学家谈人工智能
- 数据可视化(三)基于 Graphviz 实现程序化绘图
参考文献
- How to Install TensorFlow on CentOS 7
- GoLearn
- Understanding Tensorflow using Go
- Using your tensorflow model with go
- Build an Image Recognition API with Go and TensorFlow
- 以源码方式在Linux安装TensorFlow记录
- TensorFlow系统架构及高性能程序设计
- Yahoo开源TensorFlowOnSpark
- TensorFlow和Caffe、MXNet、Keras等其他深度学习框架的对比
- TensorFlow、MXNet、PaddlePaddle三个开源库对比